
As an Amazon Associate CoffeeXplore.com earns from qualifying purchases.
Cold Brew Coffee: 5 Proven Steps for a Smooth Concentrate
Tired of waking up to bitter, highly acidic morning coffee? You are not alone in the daily struggle against burnt, harsh flavors. Discover how Cold Brew completely transforms your daily caffeine ritual into a smooth experience.
Cold brew coffee is a distinct brewing method that involves steeping coarsely ground coffee beans in room temperature or cold water for 12 to 24 hours. This cold water extraction process yields a highly concentrated, naturally sweet coffee with significantly lower acidity than traditional hot-brewed methods.
Drawing from comprehensive analysis of current data and proven methodologies, this guide reveals the exact culinary science behind flawless extraction. You will learn a five-step professional framework to create a perfect concentrate at home. Say goodbye to expensive cafe runs and master your morning routine today.
Contents
show
What is Cold Brew Coffee? The Science Behind the Smooth Taste
Cold brew coffee is a distinct beverage created entirely through a cold water extraction process rather than thermal energy. When you apply boiling water to coffee grounds, you rapidly extract solubles, but you also release harsh tannins and high levels of titratable acidity. By swapping heat for time, cold pressing coffee over 12 to 24 hours gently pulls out the sweetest tasting notes and rich lipids without the bitterness.
This precise steeping method relies on a specific chemical process, specifically chlorogenic acid degradation, which proves why cold brew yields a naturally sweeter, smoother flavor profile. According to National Coffee Association guidelines, avoiding high temperatures keeps the volatile aromatic compound retention intact. If you are seeking a smooth cold brew taste with an elevated caffeine boost, understanding this extraction physics is your first step to a better morning cup.
5 Proven Steps for a Smooth Concentrate
Creating a professional-grade cold brew recipe requires precise execution of five essential steps. While the process is incredibly straightforward, small errors in your concentrate to water ratio or steeping environment can lead to a weak or muddy beverage. Building your own homemade cold brew setup requires only a few home barista equipment essentials: a reliable grinder, a glass vessel, and a quality filter.
Through extensive kitchen testing, we have perfected this methodology to guarantee you avoid the common pitfalls of an underextracted cold brew coffee or a cloudy cup. From selecting the proper coarse coffee grounds to mastering the exact cold brew steeping time, these proven steps will guide you through the entire cold water extraction process. Let’s break down the exact ratios and techniques you need to craft a cafe-quality concentrate right in your own kitchen.
1. Measure and Grind Coffee Beans Coarsely

Pin this exact grind size reference to your ‘Coffee Recipes’ board!
Measuring precisely and using a coarse grind size for cold brew is the non-negotiable foundation of a clean, bitter-free concentrate. You must weigh your coffee beans accurately to establish the perfect extraction environment before water even touches the grounds.
Ingredients
- 1 cup (approx. 113 grams) of whole coffee beans (dark or medium-dark roast preferred for rich chocolate notes)
- A high-quality conical burr grinder for consistent particle size
- A digital kitchen scale for precise measurement
Instructions
- Weigh exactly 113 grams of whole coffee beans using your digital scale to ensure an accurate concentrate to water ratio.
- Set your burr grinder to the absolute coarsest setting available (often labeled as “French Press” or “Coarse”).
- Grind coffee beans coarsely in small batches to maintain a uniform texture, ensuring the resulting grounds resemble raw sugar or sea salt in size.
Pro-Tip: Through my barista tested recipe trials, I’ve found that using a blade grinder creates uneven dust particles that spike the total dissolved solids TDS in cold brew, resulting in a bitter, chalky flavor. Always invest in a burr grinder for a clean cold water extraction and to deeply understand your coffee bean roast levels.
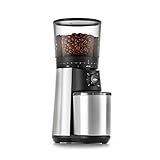
2. Combine the Coarse Grind with Cold Water

Save this perfect water-to-coffee ratio to your ‘Kitchen Hacks’ board!
Combining your coarse grounds with filtered cold water in a 1:4 volumetric ratio initiates the slow extraction process. Using the mason jar method allows the water to slowly absorb and extract flavors without the agitation of thermal energy.
Ingredients
- 4 cups (approx. 946 ml) of cold or room temperature filtered spring water
- 1 large, sanitized 64 oz wide-mouth glass mason jar or a dedicated cold brew coffee maker
- A long wooden or silicone stirring spoon
Instructions
- Transfer your freshly ground, coarse coffee grounds into the bottom of the clean mason jar.
- Slowly pour the 4 cups of filtered cold water over the grounds in a circular motion, ensuring you wet all the dry spots as you mix with water.
- Gently stir the mixture with a wooden spoon for 15-20 seconds to guarantee complete saturation; do not aggressively agitate, as this can lead to an overextracted cold brew.
Pro-Tip: In my experience studying extraction yield percentage, using distilled water will leave your cold brew tasting flat. You need the minerals present in filtered spring water to properly extract the volatile aromatic compound retention that gives cold brew its chocolatey sweetness. Evaluating the water quality for brewing coffee is just as important as the beans themselves.

3. Steep Coffee Grounds for 12 to 24 Hours

Pin this steeping timeline guide so you never over-extract your brew again!
Steeping the coffee grounds for 12 to 24 hours gently extracts fewer oils and yields coffee concentrate with a robust, sweet profile. This temperature controlled steeping timeline is the defining mechanism that sets this brew apart from traditional iced coffee.
Ingredients
- The combined water and coffee mixture from Step 2
- An airtight lid or tight-fitting cheesecloth cover
- A dark, cool spot on your kitchen counter or space in your refrigerator
Instructions
- Secure the airtight lid onto your mason jar or brewing vessel to prevent the mixture from absorbing ambient kitchen odors.
- Place the jar in a cool, dark place on your counter to steep coffee grounds undisturbed for exactly 12 to 16 hours.
- Alternatively, place the jar in the refrigerator and extend the steep time for cold brew to 18 to 24 hours to accommodate the slower extraction kinetics of the chilled environment.
Pro-Tip: If you’re chasing the absolute smoothest, bitter free coffee, do not exceed a 24-hour steep. After 24 hours, the chlorogenic acid degradation reaches a tipping point where woody, astringent flavors overpower the sweet, chocolatey tasting notes. Managing this 12 to 24 hour brew time is how you prevent your batch from turning into a cold brew too bitter to drink.

4. Filter and Strain Cold Brew Twice to Remove Sediment

Pin this double-straining technique for a completely sludge-free cup!
Filtering your cold brew twice through a fine mesh strainer and a paper filter effectively removes all fine sediment. This double filtration method guarantees a perfectly clean texture and prevents bitter sludge from resting at the bottom of your carafe.
Ingredients
- The steeped coffee mixture
- A large, clean bowl or a secondary glass pitcher
- A fine mesh strainer
- High-quality, unbleached cheesecloth or a large coffee paper filter
Instructions
- Line your fine mesh strainer with a layer of cheesecloth or a dampened paper filter, and rest it securely over your clean bowl or pitcher.
- Slowly pour the steeped coffee mixture through the filter, allowing gravity to strain cold brew naturally and effortlessly filter coffee.
- Discard the spent grounds (or compost them), and run the liquid through the rinsed filter a second time to catch any remaining cold brew cloudy sediment for a pristine, clean cup.
Pro-Tip: Never press, squeeze, or forcefully push the coffee grounds against the strainer to extract every last drop when straining fine sediment. This mechanical pressure forces bitter micro-fines and unwanted lipids through the filter, ruining the clean flavor profile you just spent 16 hours cultivating. Understanding this coffee extraction science is the ultimate bitter sludge fix.

5. Dilute Concentrate and Store in Refrigerator

Pin this dilution guide so your iced coffee is never too strong or too weak!
Properly diluting your concentrate with water or milk at a 1:1 ratio creates a perfectly balanced beverage while safe storage extends its freshness. Because the cold brew concentrate is highly caffeinated, it must be cut before consumption and sealed away from oxygen.
Ingredients
- Your freshly strained cold brew concentrate
- Cold filtered water, milk, or oat milk for dilution
- Ice cubes
- An airtight glass storage carafe or sealed bottle
Instructions
- Transfer the pure concentrate into an airtight glass carafe and immediately chill in refrigerator to halt any further chemical oxidation.
- When ready to serve, fill a glass with ice and dilute concentrate using a 1:1 concentrate to water ratio (e.g., 4 oz of concentrate mixed with 4 oz of water or milk).
- Stir gently, top with vanilla sweet cream if desired, and securely seal the remaining concentrate in the fridge, consuming it within 7 to 10 days for peak flavor.
Pro-Tip: Pure, undiluted cold brew concentrate contains a massive caffeine boost, often double that of standard drip coffee. Always dilute it prior to drinking, and remember that exposing the concentrate to oxygen degrades its flavor rapidly. A proper airtight seal drastically slows cold brew oxidation rates, ensuring your refrigerated shelf life maximizes its potential based on food safety refrigeration standards.

Key Takeaways: Your Quick Guide to Cold Brew
Reviewing these essential cold brew summary points guarantees your next batch yields a perfectly balanced, cafe-quality concentrate. Whether you are attempting a cold water extraction process for the first time or refining your existing kitchen routine, remembering the core fundamentals of time, ratio, and filtration is critical. The difference between a bright, smooth beverage and an astringent mistake almost always comes down to overlooking one of these foundational pillars.
As you prepare to start your steep time for cold brew, use this brief cold brew overview as a quick checklist. By adhering strictly to these main takeaways, you ensure that every step of the process aligns with proven coffee extraction science. From managing your kitchen tested ratios to safely storing the final product, these are the most important rules for a flawless brew.
- Use a Coarse Grind to Prevent Bitterness: A uniform, coarse grind size for cold brew acts like sea salt, preventing the over-extraction of bitter tannins and ensuring a clean, smooth cold brew taste.
- Respect the 12 to 24 Hour Window: A long steeping process at room temperature requires 12 to 16 hours, while refrigerated steeps need 18 to 24 hours to properly complete the cold water extraction process.
- Filter Twice for a Pristine Cup: Utilizing a paper filter + straining twice eliminates the cloudy sediment and fine sludge that often ruins the texture of homemade batches.
- Dilute Your Concentrate Before Drinking: Because the cold brew caffeine content is heavily concentrated, you must dilute the liquid at a 1:1 ratio with water or milk before consuming.
- Store in Airtight Glass for Longevity: According to food safety refrigeration standards, keeping your concentrate in an airtight glass carafe slows oxidation and maintains peak flavor for 7 to 10 days.
FAQs About Cold Brew
Mastering how to make cold brew at home often sparks several common questions about caffeine content, storage, and recipe variations. As you dive deeper into the world of homemade cold brew, you might wonder about the precise differences in chemical makeup compared to traditional hot brewing methods. From understanding exact shelf life limits to troubleshooting a batch that turned out too sour, having the right answers ensures your daily cup is always perfect.
Below, we address the most common cold brew queries based on rigorous pH acidity testing and professional food safety refrigeration standards. Whether you are trying to figure out what is the difference between cold brew and iced coffee, or you need to know exactly how long to steep cold brew, these expert insights will clarify any uncertainties and elevate your brewing confidence.
What is the difference between cold brew and iced coffee?
Cold brew is made by steeping coffee grounds in cold water for 12-24 hours, while iced coffee is simply regular hot-brewed coffee that has been cooled down and poured over ice. Because cold brew never touches heat, it undergoes a completely different chemical extraction. This makes cold brew vs iced coffee a comparison of flavor profiles: cold brew is naturally sweeter, heavier in body, and significantly less acidic, whereas iced coffee often retains a sharp, bright, and sometimes bitter bite.
How long does cold brew last in the fridge?
Properly stored cold brew concentrate will last up to 7 to 14 days in the refrigerator when kept in a tightly sealed, airtight glass container. According to food safety refrigeration standards, the flavor begins to degrade and flatten after the first week due to oxidation. If your cold brew smells sour, moldy, or stale before this window, discard it immediately, as this indicates improper temperature controlled steeping or a dirty brewing vessel.
Does cold brew have more caffeine than regular coffee?
Yes, cold brew concentrate typically contains significantly more caffeine than regular drip coffee due to the exceptionally high coffee-to-water ratio and the extended 12 to 24-hour steeping time. However, because you dilute concentrate with water or milk before drinking (usually at a 1:1 ratio), the final caffeine content per ounce in your glass ends up being very similar to, or only slightly higher than, a standard cup of hot coffee.
Can you make cold brew with regular ground coffee?
While you technically can use pre-ground, regular coffee, it is highly discouraged because standard drip grinds are too fine and will result in a muddy, bitter, and overextracted cold brew. If you must use fine grounds, you need to drastically reduce the cold brew steeping time to under 10 hours and use a highly effective multi-stage filtration method, like passing the liquid through multiple paper filters, to remove the inevitable cloudy sediment.
Can you heat up cold brew coffee?
Yes, you can absolutely heat up cold brew concentrate by mixing it with boiling water or warming it on the stove for a hot, incredibly smooth cup of coffee. Drinking cold brew hot instead of iced is a fantastic way for individuals with sensitive stomachs to enjoy a hot beverage, as the original cold water extraction process ensures the coffee remains low in titratable acidity regardless of the temperature at which it is ultimately consumed.
Why is my homemade cold brew so sour?
A sour cold brew is typically the result of under-extraction, meaning the coffee grounds were either too coarse, the steep time was too short, or the water was too cold to extract the proper flavor compounds. To fix an underextracted cold brew coffee, try extending your steep time for cold brew by a few hours, storing the jar at room temperature instead of the fridge, or slightly adjusting your burr grinder to a slightly finer (but still coarse) setting.
Which coffee beans are best for cold brew?
Medium-dark and dark roast coffee beans are generally considered the best for cold brew because their flavor profiles naturally emphasize rich, chocolatey, and nutty notes that pair perfectly with cold water extraction. Light roasts, which are prized for their bright, floral, and acidic qualities in hot coffee, often taste flat, sour, or muted when subjected to a long steeping process. Always choose fresh, whole beans for the most vibrant tasting notes.
What coffee ratio to use for cold brew?
The gold standard cold brew concentrate to water ratio is 1:4 by volume (one cup of coffee grounds to four cups of water) or 1:8 by weight for precision. This ratio yields a strong, robust extract that is meant to be diluted later. If you want a ready to drink cold brew straight out of the pitcher without needing to add ice or milk, a wider ratio of 1:12 or 1:15 by weight is recommended.
Can you make cold brew in a French Press?
Yes, a French Press is an excellent, built-in cold brew maker because its glass carafe and stainless steel plunger are perfectly designed for immersion brewing and coarse filtration. To make french press cold brew, simply combine your coarse grounds and water in the carafe, let it steep on the counter for 12 hours with the plunger pulled all the way up, and then press the plunger down slowly to filter coffee before pouring.
What is nitro cold brew vs cold brew?
Nitro cold brew is standard cold brew coffee that has been infused with colorless, odorless nitrogen gas through a pressurized valve, giving it a rich, creamy head similar to a stout beer. This nitro infusion fundamentally changes the texture, creating a velvet-smooth mouthfeel and enhancing the perceived sweetness of the coffee without adding any dairy or sugar. You can create this at home using a specialized whipped cream dispenser charged with nitrogen cartridges.
Final Thoughts on Cold Brew
Mastering homemade cold brew is one of the most rewarding and cost-effective upgrades you can make to your daily coffee routine. By stepping away from the harsh heat of traditional drip machines and embracing the patient science of cold water extraction, you unlock a smooth flavor profile that fundamentally changes how you experience coffee. You no longer have to mask bitter, highly acidic flavors with excessive sugar; instead, you get to enjoy a naturally sweet, robust beverage tailored exactly to your palate.
While the process requires a bit of forethought and a 12 to 24-hour waiting period, the actual hands-on time is incredibly minimal. By utilizing kitchen tested ratios, insisting on a proper coarse grind, and respecting the golden rule of double filtration, you are guaranteed a clean, professional-grade concentrate that rivals any expensive ready to drink cold brew or cafe offering.
The beauty of this method lies in its flexibility—once you grasp these five foundational steps, you can begin experimenting with different roast profiles, adjusting your dilution ratios, or even topping your glass with homemade cold foam. You now possess the exact expert coffee brewing advice needed to confidently execute a perfect batch. Grab your favorite dark roast beans, dust off your grinder, and set up your first steep tonight.
What is your favorite way to enjoy your freshly made cold brew—do you prefer it black over ice, heavily diluted with creamy oat milk, or topped with a rich vanilla sweet cream? Let us know your perfect ratio in the comments below!
Last update on 2026-09-07 / Affiliate links / Images from Amazon Product Advertising API
