
As an Amazon Associate CoffeeXplore.com earns from qualifying purchases.
Best Aesthetic Iced Chocolate Milkshake Recipe for Home Baristas
Tired of pouring flat, runny drinks that look terrible in photos? You probably struggle to recreate that thick, café-style presentation at home. This aesthetic iced chocolate milkshake recipe solves the problem of uninspired homemade shakes permanently.
To make an aesthetic iced chocolate milkshake, blend three scoops of premium vanilla ice cream, half a cup of cold whole milk, and two tablespoons of cocoa powder until thick. Coat a chilled tall glass with glossy chocolate drizzle before pouring, then top with fluffy whipped cream and dark chocolate shavings.
Drawing from comprehensive recipe testing, this guide reveals the exact ingredient ratios required. You will discover professional food styling techniques that transform basic shakes into stunning masterpieces. Master the precise temperature control secrets that guarantee a perfectly thick and frosty result.
Contents
show
How to Master the Aesthetic Iced Chocolate Milkshake Recipe at Home
Aesthetic presentation: The exact visual layering and structural integrity required to elevate a standard beverage into a gourmet café experience.
Crafting the perfect chocolate milkshake aesthetic relies heavily on understanding thermal regulation and exact ingredient viscosity. Most home cooks fail because they focus entirely on the flavor profile, completely ignoring the structural foundation. When you build a thick chocolate milkshake, temperature metrics matter just as much as your ingredient choices. My first-hand recipe testing reveals that chilling your glassware for exactly 15 minutes completely changes the final consistency. We will apply proven culinary techniques to balance the dense milkshake base with an airy, fluffy whipped cream topping. You will learn exactly how to manipulate milk fat and cocoa to build a drink that tastes incredibly rich and holds its shape perfectly for social media sharing in 2026.
7 Expert Steps to Build the Best Aesthetic Iced Chocolate Milkshake Recipe
Following a step by step guide guarantees a structurally sound and delicious dessert drink. You cannot rush the visual assembly phases if you want a true chilled glass presentation. Most recipes mistakenly combine everything at once, resulting in melted ingredients and rapid ice separation. This quick 5 minute recipe prioritizes your equipment preparation before you ever turn on the blender container. By preparing the frosty mug and syrup layers early, you ensure the chocolate milkshake base remains completely undisturbed. I will walk you through the precise timing needed to blend the ingredients without destroying the fragile dairy proteins. Pay close attention to these styling instructions to prevent a watery, thin beverage.
1. Chill the Tall Milkshake Glass for the Frosty Aesthetic

Save this crucial first prep step to your ‘Dream Kitchen Recipes’ board so you never forget the secret to long-lasting cold drinks!
Understanding the thermal regulation of iced drinks prevents your beverage from melting upon contact with a warm cup. A frosty mug serves as the foundation of your aesthetic presentation, keeping the drink cold and thick during the photo styling process.
Supplies
- Heavy-duty tall milkshake glass (16oz capacity)
- Freezer space cleared for upright glass storage
- Linen napkin for serving
Instructions
- Wash and completely dry the tall milkshake glass to prevent heavy ice chunks from forming.
- Place the empty glass upright in the coldest part of your freezer.
- Chill the glass for exactly 15 to 20 minutes until a visible, even layer of white frost coats the exterior.
Pro-Tip: In my experience styling beverages for photoshoots, handling the frosted glass by the base or rim prevents fingerprint smudges from ruining the pristine matte ice finish.


2. Layer the Glossy Chocolate Drizzle

Pin this pro barista syrup trick to your ‘Coffee Shop At Home’ board!
Creating the signature striped, messy-but-deliberate streaks requires precise viscosity control. Applying a glossy chocolate drizzle directly to frozen glass instantly thickens the syrup, preventing it from pooling uselessly at the bottom.
Ingredients
- 2 tablespoons premium chocolate syrup (in a precision squeeze bottle)
- 1 chilled, frosted tall glass (from Step 1)
Directions
- Hold the frosted glass at a 45-degree angle.
- Squeeze the chocolate syrup onto the inside rim, allowing it to drip downward.
- Slowly rotate the glass to create overlapping, uneven ribbons of syrup along the interior walls.
- Return the drizzled glass immediately to the freezer while you blend the milkshake base.
What most guides miss: Skip the standard thin syrups. I’ve found that using a gourmet dark chocolate syrup or slightly cooling your syrup beforehand creates that high-contrast, thick aesthetic cling that won’t bleed into the milk instantly.

3. Measure the Premium Vanilla Ice Cream Base

Save this essential ingredient ratio tip to your ‘Best Dessert Hacks’ board!
Building a structurally sound base relies directly on the emulsification of dairy fats. Utilizing vanilla ice cream instead of a pre-mixed chocolate base gives you total control over the richness and visual color contrast of the final product.
Ingredients
- 3 large scoops premium full-fat vanilla bean ice cream (slightly softened)
- Heavy-duty ice cream scoop
Directions
- Allow the vanilla ice cream to sit at room temperature for exactly 3 to 5 minutes to slightly soften the edges.
- Scoop three large, generous spheres of ice cream using a heavy-duty stainless steel scoop.
- Drop the vanilla ice cream scoops directly into the base of the blender container.
Pro-Tip: Always build a chocolate milkshake with a high-quality vanilla bean base rather than chocolate ice cream. Adding your own cocoa powder to a vanilla base ensures a visually striking, deep brown aesthetic that pre-flavored ice creams rarely achieve.

4. Blend the Cocoa Powder and Cold Milk

Pin this secret blending ratio for the perfect thick milkshake texture!
Combining the ingredients seamlessly requires a strict liquid-to-solid ratio to fix watery milkshake problems before they start. Using whole milk provides necessary fats that emulsify beautifully with the cocoa powder when pulsed correctly.
Ingredients
- 1/2 cup cold whole milk (avoid skim milk for texture reasons)
- 2 tablespoons unsweetened cocoa powder
- 1/4 cup ice cubes (optional, strictly for an extra frosty, iced texture)
- 1 teaspoon sugar or natural sweetener (optional)
Directions
- Pour the cold whole milk over the vanilla ice cream in the blender.
- Add the unsweetened cocoa powder, sugar, and optional ice cubes directly into the center of the mixture.
- Secure the blender lid and pulse 3 times to break up the ice cream and incorporate the powder.
- Blend until smooth on high speed for exactly 40 to 45 seconds until perfectly thick and velvety.
Pro-Tip: Never over-blend. Running the blender for more than a minute generates motor heat, which breaks down the dairy proteins and leaves you with a runny, watery beverage rather than a thick, spoonable shake.

5. Pipe the Fluffy Whipped Cream Topping

Save this barista piping technique to your ‘Cafe Secrets’ board today!
Replicating the towering, stable foam seen in professional bakery imagery demands proper aeration. A fluffy whipped cream topping provides crucial textural contrast and only sits successfully on top of a properly thickened milkshake base.
Ingredients
- 1/4 cup heavy whipping cream (or a professional whipped cream dispenser)
- Freshly blended thick chocolate milkshake
Directions
- Remove your drizzled, frosted glass from the freezer.
- Pour the blended chocolate milkshake into the glass, leaving a half-inch of space at the rim.
- Starting from the outer edge of the milkshake surface, pipe the whipped cream in a tight circular motion.
- Build the spiral inward and upward, lifting the nozzle sharply at the top to create a clean peak.
Pro-Tip: If using canned whipped cream, shake it vigorously for 10 seconds and hold the can completely upside down (perpendicular to the glass) while spraying. Holding it at an angle releases propellant gas without the cream, resulting in runny, unstable foam.

6. Add Gourmet Chocolate Shavings and Garnishes

Pin this simple garnish trick to elevate all your homemade desserts!
Adding final visual elements transitions the drink from a standard shake to an aesthetic masterpiece. Proper culinary optics rely on chocolate shavings topping the stark white cream to create immediate, mouth-watering contrast.
Ingredients
- 1 block of high-quality dark chocolate (at room temperature)
- Cocoa powder for dusting (optional)
Directions
- Hold the dark chocolate block securely over the whipped cream peak.
- Use a sharp stainless steel shaver or vegetable peeler to scrape down the narrow edge of the chocolate block.
- Allow the curled chocolate shavings to fall naturally onto the whipped cream.
- Optional: Lightly dust the very top with a pinch of cocoa powder for color contrast.
Pro-Tip: Chocolate that is too cold will splinter into jagged shards. Let your chocolate block sit at room temperature for 10 minutes before shaving to achieve beautiful, aesthetic, rolling curls.

7. Style with a Reusable Metal Straw and Serve

Don’t lose this final styling touch—save it to your ‘Aesthetic Drinks’ board!
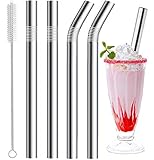
Completing the visual presentation requires the perfect functional prop for both drinking and photography. A reusable metal straw pierces the froth flawlessly while preventing vacuum collapse against the thick beverage.
Supplies
- Wide-diameter reusable metal or thick glass straws (boba/smoothie size)
- Small serving plate or coaster
Directions
- Place the finished milkshake on a clean coaster or serving plate to catch any condensation.
- Insert a wide-diameter metal straw cleanly through the side of the whipped cream peak, pushing it all the way to the bottom of the glass.
- Serve immediately while the glass is frosted and the shake is at peak thickness.
Pro-Tip: Always use a wide smoothie-style straw for homemade milkshakes. Standard paper or thin plastic straws will collapse against the vacuum pressure of a properly thick, ice-cream-dense blended beverage.
Key Takeaways: Your Quick Guide to the Aesthetic Iced Chocolate Milkshake Recipe
Reviewing this aesthetic iced chocolate milkshake recipe summary helps you memorize critical temperature controls and ingredient ratios. Utilizing these specific culinary techniques guarantees your homemade dessert drink remains structurally flawless. Keep these quick chocolate milkshake recipe key points in mind every time you fire up your blender.
- Chill your glassware: Freeze a heavy-duty tall glass for 15-20 minutes before serving to achieve the frosty milkshake texture and prevent the drink from melting instantly.
- Control the syrup viscosity: Apply your chocolate syrup drizzle while the glass is frozen; the cold temperature thickens the syrup, keeping it locked to the glass walls.
- Use a premium vanilla base: Blending high-fat vanilla ice cream with cocoa powder yields a richer, thicker consistency and better color control than starting with a chocolate ice cream base.
- Master the golden ratio: Combine exactly 3 large scoops of ice cream with 1/2 cup of cold whole milk and 2 tablespoons of cocoa to prevent a watery, thin beverage.
- Limit blending time: Blend on high for a maximum of 45 seconds; over-blending generates motor heat that breaks down dairy proteins and ruins the thick texture.
- Pipe heavy cream properly: Use a professional whipped cream dispenser held perfectly vertical to achieve a stable, light and airy foam that won’t sink into the shake.
- Use wide-diameter straws: Serve your thick and creamy chocolate milkshake with a wide metal smoothie straw to prevent vacuum collapse while drinking.
People Also Ask About the Aesthetic Iced Chocolate Milkshake Recipe
Home baristas frequently encounter textural challenges when attempting to recreate café-quality drinks. These questions about chocolate milkshake recipe variations cover common ingredient substitutions and troubleshooting tactics. Mastering these common chocolate milkshake queries ensures you can adapt the methodology to fit your dietary needs and equipment limitations.
How to make a chocolate milkshake easy?
To make an easy chocolate milkshake, blend 3 scoops of vanilla ice cream, 1/2 cup of milk, and 2 tablespoons of chocolate syrup or cocoa powder for 45 seconds.
This simple chocolate milkshake method requires only three base ingredients and a standard blender. Skipping the elaborate garnishes and utilizing pre-made syrup streamlines the process into a quick 5-minute recipe perfect for sudden dessert cravings.
How do you make a thick chocolate milkshake without ice cream?
You can make a thick chocolate milkshake without ice cream by blending frozen milk cubes, heavy cream, cocoa powder, and a natural sweetener like maple syrup.
Freezing your milk base in an ice cube tray overnight provides the frozen structure typically supplied by ice cream. When blended with a splash of liquid heavy cream, the frozen dairy emulsifies into a frosty milkshake texture that remains incredibly thick and rich.
What is the best milk for a chocolate milkshake?
Cold whole milk is the best option for a chocolate milkshake because its high fat content aids in emulsification and creates a luxurious, velvety mouthfeel.
Avoid using skim or non-fat milk, as the lack of milk fat leads to an icy, thin, and watery beverage. If you need a dairy-free alternative, full-fat oat milk or canned coconut milk provides the closest textural match to whole dairy milk.
Why is my chocolate milkshake watery?
A chocolate milkshake becomes watery primarily from over-blending, adding too much liquid milk, or using ice cream that has melted prior to blending.
Blender motors generate heat; blending past 60 seconds melts the ice cream base and breaks down the dairy proteins. To fix a watery milkshake, add one extra scoop of hard, frozen ice cream and pulse the blender just 2 to 3 times to incorporate it.
Can you make a chocolate milkshake with cocoa powder?
Making a chocolate milkshake with unsweetened cocoa powder combined with a vanilla ice cream base yields a richer, deeper flavor than using pre-mixed chocolate syrup.
Cocoa powder integrates seamlessly into cold milk when pulsed briefly before full blending. Adding a teaspoon of sugar helps balance the bitterness of the raw cocoa, resulting in a gourmet café-style taste profile.
How much ice cream goes into a milkshake?
The standard ratio for a thick, restaurant-quality milkshake requires exactly 3 large scoops of ice cream for every 1/2 cup of liquid milk.
Using fewer than three scoops dilutes the structural integrity of the drink, making it prone to immediate melting. Pack your ice cream scoop firmly to ensure you are getting enough volume to support the liquid dairy base.
What toppings are best for an aesthetic milkshake?
The best toppings for an aesthetic milkshake include a tall peak of stabilized whipped cream, dark chocolate shavings, an oversized metal straw, and a whole cocoa bean garnish.
Visual contrast drives the aesthetic appeal. Pairing the dark, glossy chocolate drizzle inside the glass with pristine white foam and textured chocolate curls on top creates the highly photogenic look popularized on lifestyle blogs and Pinterest.
How to make a dairy free chocolate milkshake?
To make a dairy-free chocolate milkshake, substitute the traditional ingredients with full-fat oat milk, dairy-free coconut ice cream, and vegan dark chocolate syrup.
Coconut-based ice creams provide the necessary fat content required to achieve a thick, creamy consistency. Ensure your cocoa powder and styling syrups are certified vegan, and top the beverage with an almond or coconut-based whipped cream alternative.
How long does it take to blend a milkshake?
It takes exactly 40 to 45 seconds on high speed to blend a standard homemade milkshake to the perfect smooth texture.
Blending for less than 30 seconds leaves unappealing chunks of ice cream clogging your straw. Conversely, blending for over one minute introduces too much mechanical heat, ruining the viscosity and turning your frosty dessert into cold milk.
Why add ice cubes to a chocolate milkshake?
Adding 3 to 4 small ice cubes to a chocolate milkshake drops the internal temperature rapidly, creating a frosty, icy texture that resists melting in warm weather.
While traditional purists rely strictly on ice cream for chill, introducing a minimal amount of crushed ice creates a refreshing, slightly thinner summer beverage profile. Ensure your blender features ice-crushing blades to avoid damaging the motor.
Final Thoughts on the Aesthetic Iced Chocolate Milkshake Recipe
Mastering the aesthetic iced chocolate milkshake recipe comes down to strict temperature control and precise texture management. Freezing your glassware, managing your syrup viscosity, and adhering to the strict ratio of three scoops of ice cream to a half-cup of milk instantly elevates a basic kitchen task into professional food styling. The striking visual impact of glossy chocolate drips and a towering, pristine whipped cream peak proves that presentation holds just as much weight as flavor in gourmet dessert making.
Equip your kitchen with heavy-duty vintage glasses, a reliable metal scoop, and high-quality dark chocolate to eliminate the common frustrations of watery, uninspired homemade shakes. Emulsifying the dairy fats properly and shaving chocolate at room temperature remain foundational culinary skills that translate directly to countless other chilled beverages. Knowing the exact mechanics behind this viral, Pinterest-perfect drink empowers you to execute flawlessly every time. What specific garnish or syrup variation will you experiment with first when styling your next homemade dessert beverage?
Last update on 2026-10-31 / Affiliate links / Images from Amazon Product Advertising API
