
As an Amazon Associate CoffeeXplore.com earns from qualifying purchases.
Cozy Little Coffee Aesthetic Ideas: Morning Setup for Coffee Lovers
Whether you are working with a cramped kitchen nook or an awkward apartment alcove, transforming your space into an inspiring daily retreat often starts with a single, intentional zone. Finding practical little coffee aesthetic ideas can feel overwhelming when staring down cluttered countertops, harsh fluorescent lighting, and limited square footage.
A cozy coffee corner requires a dedicated 24-inch surface, warm directional lighting at 2700 Kelvin, natural textures like raw oak or linen, and a consolidated tray for brewing tools. Organizing accessories onto a single grounded platform creates visual order, while earthy tones and ambient illumination turn small countertop spaces into intentional morning retreats.
Drawing from architectural spatial planning and tested small space solutions, this guide translates commercial cafe design principles down to residential kitchen triangles using proven zoning benchmarks. You will discover exact material palettes, tactile surface pairings, and step-by-step methods to eliminate countertop friction and build an inviting morning station in 2026.
Contents
show
9 Cozy Little Coffee Aesthetic Ideas for an Inspiring Morning Setup
1. Mount a Floating White Oak Shelf with Integrated Task Lighting

Pin this minimalist shelf layout to your Morning Coffee Board to recreate the look this weekend!
Reclaiming crowded kitchen counter areas is essential for maintaining a calm morning routine, and vertical wall clearance offers the ideal solution for storing brewing essentials. When you move grinders, carafes, and cups off your flat work surfaces, you immediately eliminate visual clutter from your food preparation zones.
To achieve this safely and cleanly, structural wall anchoring is paramount, especially when handling heavy ceramic and stoneware collections. Here is how to install your floating shelf unit:
Supplies Needed
- 1 solid white oak floating shelf (24 inches wide by 8 inches deep, pre-routed for concealed brackets)
- 1 pair heavy-duty concealed steel wall bracket rods (rated for minimum 45 lbs)
- 1 stick-on rechargeable 2700K warm LED light strip with magnetic mounting base
- 2 speckled ceramic coffee cups with hand-pinched handles
- 1 borosilicate glass pour-over carafe with wooden collar
- Heavy-duty drywall anchors and 2.5-inch cabinet screws
Step-by-Step Directions
- Locate wall studs using a magnetic stud finder at eye level, roughly 18 inches above your kitchen counter.
- Level and secure the steel floating bracket base directly into the wall studs using 2.5-inch cabinet screws.
- Slide the pre-routed white oak shelf over the bracket rods until it sits completely flush against the plaster surface.
- Affix the magnetic warm LED light bar along the routed underside rear groove to hide the direct light source.
- Place your daily ceramic cups, carafe, and pour-over cone on the upper surface, keeping frequently grabbed items to the open front edge.
Pro-Tip: Always space floating shelf brackets directly into wall studs rather than relying solely on drywall toggle bolts; coffee grinders and ceramic collections introduce dynamic weight loads every time you lift and replace equipment.

2. Style a Fluted Travertine Tray for Countertop Organization

Pin this stone tray styling hack to your Kitchen Organization board for instant countertop calm!
Establishing an intentional, organized coffee boundary on a shared kitchen worktop is entirely possible without permanent renovations. Interior design principles show that trays create a powerful psychological grounding effect; grouping loose jars and tools onto a single natural stone boundary fools the eye into perceiving a single organized entity rather than scattered mess.
To set up your stone tray effectively, follow these straightforward steps:
Supplies Needed
- 1 rectangular honed travertine or marble tray (minimum 12 x 8 inches with raised rim)
- 4 clear non-slip silicone adhesive bumper feet
- 1 manual brass or brushed steel burr grinder
- 1 ribbed ceramic canister with airtight silicone-sealed wood lid
- 1 natural horn or hardwood coffee measuring spoon
- 1 waffle-weave cotton barista cloth
Step-by-Step Directions
- Clean and dry the underside corners of your travertine tray, applying small silicone bumper feet to prevent countertop scratching.
- Position the stone tray in the quietest kitchen corner, away from sink splash zones and stove grease.
- Set your manual bean grinder in the rear corner of the tray to act as the primary vertical anchor.
- Arrange the airtight bean canister directly next to the grinder, placing the wooden measuring spoon alongside it.
- Fold a neutral waffle-weave barista cloth neatly beneath the rim for immediate wipe-downs during morning espresso extraction.
Pro-Tip: Travertine is naturally porous; apply a single coat of food-safe natural stone penetrating sealer before placing it next to dark coffee oils to stop permanent drip staining.


3. Transform an Antique Wall-Hung Cabinet with Fluted Glass

Save this vintage coffee cabinet inspiration to your Dream Kitchen board to source at your next flea market visit!
Adding architectural warmth and dust-free storage for delicate glassware can be achieved easily using thrifted furniture. Closed storage hides chaotic product packaging while reeded glass panels diffuse light and obscure clutter.
Restoring an antique cupboard requires attention to structural joints and hardware maintenance. Here is how to complete the transformation:
Supplies Needed
- 1 reclaimed wooden wall-hung medicine cabinet or spice cupboard
- 2 panels of replacement 4mm reeded or fluted glass (custom cut to door dimensions)
- 1 pair aged unlacquered brass ball-tipped cabinet hinges
- 1 can clear beeswax furniture polish
- Natural bristle waxing brush and lint-free cotton buffing cloth
- Structural wood screws for wall backing reinforcement
Step-by-Step Directions
- Remove all old hardware, doors, and loose paint flakes; scrub wood surfaces using mild soap and warm water.
- Sand rough splintered corners with 180-grit paper, maintaining the natural age dents, and apply clear beeswax polish across all exterior grain.
- Install reeded glass panels into the door frames using glazing points or interior wooden retaining trim strips.
- Replace loose hinges with solid unlacquered brass hardware, verifying that doors swing smoothly without binding.
- Anchor the cabinet securely to wall framing using structural screws driven through the cabinet’s internal rear cleat.
- Organize mug collections on the middle shelf, stacking flat saucers below and keeping seasonal filters on the top level.
Pro-Tip: When using antique storage for coffee beans, ensure the wood interior is thoroughly seasoned and odor-free; old pine cupboards stored in damp basements easily transfer musty aromas into roasted porous coffee beans.

4. Build a Biophilic Morning Perch with Trailing Plants and Sunlight

Pin this sun-drenched plant coffee perch to your Cozy Morning Aesthetic board for instant inspiration!
Merging natural indoor greenery with manual morning brewing routines on sun-drenched windowsills creates a restorative atmosphere. Environmental psychology studies demonstrate that biophilic living elements combined with natural daylight exposure improve cognitive restoration during morning hours.
To design a thriving green coffee perch without sacrificing workspace sanitation, follow these steps:
Supplies Needed
- 1 raw unglazed terracotta footed plant pot with matching drip saucer (6-inch diameter)
- 1 healthy satin pothos (Scindapsus pictus) or trailing heartleaf philodendron
- 1 8-cup borosilicate glass French press with brushed stainless steel frame
- 1 heavy linen table runner (14 x 36 inches, unbleached oat color)
- 1 wooden soil moisture meter probe
- 1 organic plant leaf shine spritzer
Step-by-Step Directions
- Unroll the coarse linen runner along a clean, south- or east-facing windowsill to protect the ledge finish.
- Pot your pothos using well-draining indoor potting mix, securing the base securely into the terracotta saucer.
- Position the planter at the corner where the window casing meets the wall so vines trail along the side frame rather than crowding counter equipment.
- Place your glass French press and single morning mug 6 inches from the plant saucer to prevent potting soil contamination.
- Check soil dryness using your moisture probe each morning while waiting for water to boil, integrating plant maintenance directly into brewing time.
Pro-Tip: Avoid placing heat-generating electric gooseneck kettles directly beneath plant leaves; thermal updrafts and hot steam dry out tropical foliage and turn leaf tips crisp within days.

5. Install an Unlacquered Brass Sconce over a Ceramic Hook Rack

Save this warm lighting and mug hook layout to your Home Coffee Bar board for your next DIY afternoon!
Eliminating harsh overhead kitchen ceiling cans by installing task-specific, atmospheric lighting over mug storage transforms the entire kitchen mood. Light color temperatures between 2200K and 2700K with a color rendering index (CRI) over 90 render coffee tones and ceramic glazes faithfully without blue glare.
To mount your sconce and mug rail cleanly, follow this installation procedure:
Supplies Needed
- 1 plug-in unlacquered brass swing-arm wall sconce with inline rotary dimmer
- 1 dimmable E26 LED filament bulb (2400K or 2700K, 40W equivalent, 90+ CRI)
- 1 solid walnut 4-peg shaker rack (18 inches long)
- 1 set self-adhesive brass electrical cord hider channels
- 4 artisanal studio pottery mugs with broad D-shaped handles
- Wall anchors, bubble level, and drill bits
Step-by-Step Directions
- Mark the sconce height roughly 60 inches from finished floor height, centering it over your brewing counter space.
- Secure the sconce bracket to the wall, thread the lamp cord through paintable brass channels, and affix channels vertically down to the outlet.
- Install the walnut peg rack 10 inches below the sconce base so hung mugs clear the descending cord channel.
- Screw in the 2400K dimmable filament bulb and adjust the rotary dial to 40% power to test for comfortable eye-level reading light.
- Hang your favorite daily stoneware mugs evenly across the wooden pegs, turning handle openings in the same direction for visual calm.
Pro-Tip: Choose plug-in sconces featuring integrated cord dimmers; being able to lower illumination during early dawn stops your eyes from straining before your first cup is ready.

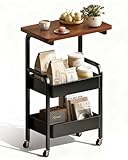
6. Convert a Three-Tier Steel Utility Cart into a Mobile Brewing Station

Pin this mobile coffee bar cart solution to your Small Apartment Hacks board to free up precious counter space!
Building a self-contained coffee center that rolls into closets or corners when kitchen surfaces are maxed out provides ultimate layout flexibility. Applying industrial work-cell ergonomics to a compact utility cart optimizes barista workflow while maintaining center-of-gravity stability.
To assemble and zone your mobile coffee cart safely:
Supplies Needed
- 1 heavy-gauge steel 3-tier utility rolling cart with locking caster wheels
- 1 fitted natural beechwood or bamboo cutting board top insert for upper shelf
- 1 variable-temperature electric matte black gooseneck kettle
- 2 wire organizational divider baskets (sized for middle basket tier)
- 1 silicone heat-resistant trivet mat (rated to 450°F)
- 1 package natural cone coffee filters (#02 size)
Step-by-Step Directions
- Assemble the steel rolling cart, fastening and locking the swivel caster wheels firmly to the base legs.
- Drop the fitted beechwood cutting board into the top metal tray to create a rigid, flat working counter for equipment.
- Position your heat-safe silicone trivet on the wood insert, seating the electric gooseneck kettle on top of it.
- Organize the middle shelf using wire divider baskets to hold paper filters, digital gram scales, and stir spoons upright.
- Store secondary backup coffee bean bags, descaling powders, and cleaning cloths on the bottom shelf to keep total weight centered low.
- Engage wheel locks once rolled into position beside a wall electrical outlet to prevent movement during hot water pouring.
Pro-Tip: Zip-tie a surge-protected power strip to the rear frame legs of the cart; this allows you to plug in your grinder, scale charger, and kettle while running only one master cord to the wall outlet.
7. Ground Brewing Essentials on a Monochromatic Travertine Slab

Save this stone slab styling method to your Minimalist Home Decor board for a gallery-worthy coffee bar!
Creating a sculptural, gallery-inspired coffee presentation on an existing island or kitchen counter establishes clear visual hierarchy. Pairing raw unpolished minerals against sleek brewing gear prevents your setup from looking clinical.
To seal and style your stone slab riser:
Supplies Needed
- 1 raw-edge tumbled travertine or unfilled limestone architectural riser slab (14 x 10 inches)
- 4 felt protective adhesive pads (1-inch diameter)
- 1 ceramic flat-bottom dripper in matte bone white
- 1 handmade stoneware coffee server carafe
- 1 solid brass pour-over timer or brass 3-minute sand timer
- Natural stone penetrating sealer spray
Step-by-Step Directions
- Spray the top and tumbled sides of the raw stone slab with penetrating sealer, allowing it to cure for 24 hours to block coffee staining.
- Stick heavy felt pads beneath the stone’s base points to ensure the heavy slab slides safely across polished quartz or wood surfaces.
- Center the stone slab in the middle of your designated coffee preparation zone.
- Place your ceramic dripper and server directly onto the stone pedestal, aligning them slightly off-center toward the left.
- Place the brass sand timer on the right side of the slab to balance visual weight without overcrowding.
Pro-Tip: Unfilled travertine has deep natural surface voids; blow out loose ground coffee dust with a manual rubber air blower rather than scrubbing with wet sponges, which cakes coffee powder into the stone pores.

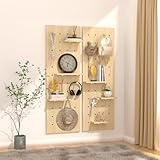
8. Build a Modular Birch Pegboard Display for Equipment Adjustability

Pin this modular birch pegboard setup to your Coffee Station Ideas board to customize your morning setup!
Constructing a flexible, reconfigurable wall display accommodates growing brewing gear collections without re-drilling walls. Scandinavian modular pegboards offer superior adaptability over fixed shelving.
To mount and configure your pegboard display:
Supplies Needed
- 1 solid birch plywood pegboard panel (24 x 36 inches, 3/4-inch thickness, 1-inch hole spacing)
- 4 3/4-inch hardwood wall stand-off spacers with long structural mounting screws
- 8 turned birch wooden dowel pegs (5-inch length)
- 2 matching birch display shelf planks (12 x 5 inches)
- 1 wooden-handled soft horsehair counter sweep brush
- Bubble level, drywall anchors, and drill driver
Step-by-Step Directions
- Hold the birch pegboard against your wall, leveling the top edge 14 inches above your counter surface.
- Mark pilot holes through the four corner mounting points directly onto the drywall.
- Install wall anchors or identify stud locations, placing the 3/4-inch stand-off spacers behind each corner hole before driving mounting screws.
- Push hardwood dowel pins into chosen holes, verifying firm friction-fit seating.
- Rest the modular plywood shelves across pairs of dowels to create ledges for scales, timers, and bean canisters.
- Hang barista cleaning brushes and portafilters from exposed individual dowel pegs for immediate grab-and-go access.
Pro-Tip: Plywood edges absorb humidity from hot coffee kettles; seal all cut pegboard edges with a water-based matte polyurethane clear coat to stop moisture swelling and veneer delamination.
9. Frame an Alcove with Tactile Oak Slats and Hidden Backlighting

Pin this modern wood slat coffee nook to your Modern Coffee Bar board to elevate your morning routine!
Turning an awkward dead-end kitchen recess into an architectural, sound-dampened coffee haven elevates your entire kitchen. Vertical wooden slats draw the eye upward, giving small alcoves the illusion of higher ceilings, while acoustic felt backing dampens loud grinder motor noise in tiled apartments.
To install acoustic slat panels and hidden lighting:
Supplies Needed
- 2 acoustic wood slat wall panels (natural oak slats bonded to 9mm recycled black acoustic felt, 48 inches tall)
- 1 tube black construction panel adhesive or 1-1/4 inch black drywall screws
- 1 COB warm white LED strip (2700K, dot-free continuous diffusion)
- 1 black aluminum corner channel with frosted milky diffuser cover
- Fine-tooth Japanese pull saw or circular saw with carbide blade
- Tape measure, spirit level, and caulking gun
Step-by-Step Directions
- Measure the width and height of your designated alcove, trimming the slat panels using a fine-tooth saw to prevent oak veneer chipping.
- Mount the aluminum corner channel vertically into the recess corner, seating the dot-free 2700K COB LED strip inside with its frosted diffuser snapped in place.
- Apply black construction adhesive in zigzag beads across the back of the felt panel, or screw directly between slats into drywall using black screws.
- Press the panels firmly against the alcove wall, butting the outer edge flush against the aluminum light channel.
- Connect the LED strip to a hidden smart plug, programming it to power on automatically 15 minutes before your morning alarm rings.
Pro-Tip: Cut slat panels with the wood face down when using a circular saw, or face up when using a manual pull saw; this prevents unsightly splintering along the delicate pre-finished oak veneer edges.

FAQs About Little Coffee Aesthetic Ideas
What is the coffee shop aesthetic?
The coffee shop aesthetic is an interior design style that combines warm ambient lighting, rich natural materials, tactile textures, and dedicated brewing displays to create an intimate, calming cafe atmosphere. It prioritizes organic textures like rough stone and unlacquered wood alongside comfortable, quiet surroundings that encourage slow living and sensory appreciation.
How to create a cozy coffee corner at home?
To create a cozy coffee corner at home, designate a clear 24-inch surface zone, incorporate warm 2700K directional lighting, ground your equipment on a stone tray, and use open shelving for handcrafted ceramic mugs. Eliminate commercial clutter by transferring beans into matching opaque canisters and routing all electrical cords out of sight.
Which materials work best for small cafe interiors?
Dense white oak, unglazed terracotta, honed travertine stone, brushed brass, and matte ceramic work best because they introduce tactile visual warmth without crowding compact footprints. Natural materials age gracefully with repeated daily use and develop an authentic patina that manufactured plastics and laminate surfaces cannot replicate.
Can you make a small coffee shop look bigger?
Yes, you can make a small coffee shop look significantly bigger by utilizing open vertical shelving, hanging frameless mirrors to bounce natural light, and matching wall colors with primary cabinetry. Keeping floor surfaces clear with wall-mounted counters and compact floating shelves immediately expands perceived room volume.
How to style a coffee bar on a budget?
Style a budget coffee bar by repurposing thrifted wood cabinets, installing simple floating shelves, transferring coffee essentials into affordable amber glass jars, and using plug-in warm puck lights. Curating secondhand ceramic mugs from local thrift stores delivers bespoke, artisanal character at a fraction of boutique retail prices.
What are the best color schemes for a coffee aesthetic?
The best color schemes combine warm neutral foundations like creamy mushroom, taupe, and warm greige accented with deep espresso brown, terracotta, and soft botanical greens. This earthy, low-contrast palette creates a relaxing visual environment that mirrors natural roasted coffee beans, steamed milk, and raw ceramic clay.
How to decorate small cafe walls?
Decorate small cafe walls with functional storage pieces like modular birch pegboards, narrow picture ledges displaying art prints, and wall-mounted brass mug rails with sturdy hanging hooks. Focusing wall decor on functional, elevated coffee accessories prevents small spaces from feeling cluttered with purely decorative dust-collectors.
Which plants fit a cozy coffee aesthetic?
Trailing satin pothos, heartleaf philodendrons, string-of-hearts, and compact olive trees complement a cozy coffee aesthetic by adding organic movement and soft leaf textures. These varieties thrive in typical indirect kitchen lighting and look stunning trailing down from open wall shelves or windowsill perches.
How to incorporate vintage items into coffee decor?
Incorporate vintage items by using antique brass pharmacy scales to hold stirrers, repurposing glass apothecary jars for beans, and mounting reclaimed wood cabinets with original patina. Mixing aged flea market finds alongside modern, clean espresso machines creates a rich, collected-over-time character that feels personal and storied.
Can minimalist design feel cozy?
Yes, minimalist design feels remarkably cozy when you emphasize warm 2400K–2700K lighting, heavy tactile surfaces like bouclé or raw linen, and rounded, curved architectural edges. Stripping away unnecessary countertop clutter while celebrating the organic textures of raw stone and wood produces a warm, peaceful space rather than a cold, clinical room.
Key Takeaways
- Ground loose items onto a dedicated stone or wood tray – Organizing grinders, canisters, and cups on a single fluted travertine or wood base removes visual clutter and establishes clear countertop zoning.
-
Prioritize 2700 Kelvin warm task lighting over ceiling fixtures – Directional plug-in brass sconces or magnetic under-shelf light bars create calming cafe ambiance without harsh overhead glare.
-
Leverage vertical wall real estate with heavy-duty floating shelves – Mounting a 24-inch white oak shelf securely into wall studs keeps prep counters clear while displaying handcrafted ceramic pottery.
-
Layer raw and contrasting tactile materials – Combine organic porous stone, matte stoneware, unlacquered brass, and natural wood grain to prevent minimalist setups from feeling sterile or clinical.
-
Mitigate sound and visual clutter using wood acoustic slats – Adding felt-backed vertical wood panels inside small alcoves dampens loud grinder motor noise and introduces rich architectural depth.
-
Conceal cords and power sources beneath trays and inside channels – Routing electrical lines through color-matched cord tracks or mounting rear power strips onto carts ensures a calm, magazine-worthy finish.
Final Thoughts
Transforming your daily coffee routine does not require an expansive kitchen remodel or an oversized commercial espresso bar. By introducing warm lighting, grounding loose accessories on natural stone slabs, and curating a few handcrafted stoneware mugs, even the most compact apartment corner becomes an inviting morning sanctuary. The beauty of the little coffee aesthetic lies in thoughtful restraint, intentional texture pairing, and functional comfort.
Begin small: clear a single 24-inch space on your kitchen counter this evening, assess your vertical wall clearance, and consolidate your daily brewing tools onto a dedicated tray. As warm light catches your ceramic dripper tomorrow morning, you will realize that taking time to curate your space changes how you experience your entire day.
Which morning coffee setup formula are you planning to bring into your space this weekend? Drop your thoughts or small-space questions in the comments below!
Last update on 2026-10-31 / Affiliate links / Images from Amazon Product Advertising API
