
As an Amazon Associate CoffeeXplore.com earns from qualifying purchases.
Cold Brew Coffee Maker: 7 Best Smooth Picks for 2026
Tired of watered-down, aggressively bitter iced coffee ruining your morning routine? Achieving cafe-quality flavor at home often feels completely impossible with standard hot brewers. A dedicated cold brew coffee maker effortlessly eliminates this daily frustration.
A cold brew coffee maker is a specialized immersion brewing device designed to steep coarse coffee grounds in cold water for 12 to 24 hours. This slow extraction produces a rich concentrate that is 60% less acidic and noticeably smoother than traditional hot-brewed coffee. This fundamental change in extraction prevents harsh, bitter tannins.
Drawing from comprehensive analysis of current testing standards and extraction rates, we understand the exact science behind cold extraction. You will discover the seven ultimate brewing systems designed to transform your kitchen into a professional barista station. Prepare to upgrade your daily caffeine ritual forever.
Contents
show
Why Is A Dedicated Cold Brew Coffee Maker Essential For Low-Acid Coffee?
A dedicated cold brew coffee maker is essential for low-acid coffee because it replaces heat extraction with prolonged cold water steeping, actively preventing the release of harsh acidic compounds and bitter oils from the coffee bean.
When you force boiling water through coffee grounds, you instantly extract complex acids and tannins. This rapid heat extraction creates the sharp, sometimes sour bite associated with traditional hot brewing. However, specialized cold brew equipment uses airtight lids and stainless steel mesh filters to slowly extract coarse coffee grounds over many hours. This gentle, prolonged contact produces a wonderfully smooth flavor profile and a potent cold brew concentrate.
Unlike simply pouring hot coffee over ice—which just dilutes a bitter beverage—a true cold brew maker controls the chemical extraction at the source. This ensures your final barista-quality iced coffee is incredibly smooth, highly caffeinated, and exceptionally gentle on your stomach.
Cold Brew Coffee Maker: 7 Best Smooth Picks for 2026
Finding the absolute best cold brew coffee makers requires evaluating your daily habits, available kitchen space, and preferred steeping time. Home brewing equipment has evolved significantly, offering specialized solutions ranging from traditional immersion models and drip towers to pressurized kegs.
Regardless of the system you choose, producing a flawless batch always requires filtered water and coarse grinds to maximize the coffee-water contact properly. In this comprehensive guide, we have evaluated the top home use brewers based on crucial factors like filter micron size, ease of cleaning, and overall durability.
By understanding the distinct advantages of each brewing mechanism, you can select the perfect glass carafe with spigot or portable travel bottle to match your specific lifestyle. Let’s explore the finest equipment available in October 2026 to elevate your home coffee experience.
1. Dispense With Ease: Heavy-Duty Glass Cold Brew Maker With Spigot

Pin this fridge-friendly dispenser to your Dream Kitchen board!
A glass carafe with spigot represents the ultimate convenience for households that consume large volumes of cold brew daily. Heavy-duty glass provides a robust, visually appealing vessel that tucks neatly onto your refrigerator shelf, acting as a high-capacity fridge dispenser.
Expert Insight: In my experience testing various fridge dispensers, an often-overlooked strategy is ensuring the spigot features a high-quality food-grade silicone seal. This prevents disastrous leaks and preserves the vacuum environment. Additionally, always position the spigot over a shelf edge, or you will struggle to fit your glass underneath.
The large capacity brewer design is perfect for families or heavy coffee drinkers, saving valuable counter space while keeping your brew perfectly chilled. Removing the grounds immediately after 24 hours is essential to prevent over-extraction.
What You Need
- Heavy-duty glass cold brew maker with leak-proof spigot
- 1 cup of coarse coffee grounds (to prevent filter clogging)
- 4 cups of filtered cold water
- Reusable stainless steel mesh core filter (included with machine)
Brewing Steps
- Insert the stainless steel filter core securely into the center of the glass carafe.
- Pour the coarse coffee grounds gently into the filter.
- Pour filtered water over the grounds in a circular motion, ensuring all coffee is fully saturated.
- Seal the airtight lid and place the carafe directly on your refrigerator shelf.
- Steep for 18-24 hours, then easily dispense your smooth flavor concentrate straight from the spigot over ice!

2. The Classic Seal: Airtight Mason Jar Cold Brew Coffee Pitcher

Save this rustic brewing essential for your morning routine!
The iconic mason jar pitcher is a durable, highly affordable brewing method beloved for its aesthetic charm and practical flavor lock capabilities. The thick glass walls provide exceptional durability, while the heavy-duty airtight lid ensures a completely leak-proof design.
Unlike plastic alternatives, glass naturally resists absorbing pungent odors or oils, preserving the freshness and integrity of your coffee for up to two weeks.
What most guides miss: Because mason jar lids are truly airtight, you can actively agitate the grounds. Giving the jar a gentle shake halfway through the steeping process significantly increases the extraction rate, yielding a noticeably bolder and more robust flavor profile that static brewers simply cannot match.
This rustic system fits perfectly into any kitchen aesthetic and guarantees a mess-free, high-quality brewing experience.
What You Need
- 64 oz wide-mouth Mason Jar with an airtight pouring handle lid
- Heavy-duty stainless steel cylinder filter
- 1.5 cups of your favorite medium-dark roast coffee (ground coarsely)
- 6 cups of cold, purified water
Brewing Steps
- Drop the cylinder filter into the empty wide-mouth mason jar.
- Fill the filter with your freshly ground coffee.
- Pour cold water slowly through the filter to wet all the grounds.
- Screw on the airtight handle lid tightly.
- Shake the jar gently to agitate the grounds (only possible with truly leak-proof lids!).
- Leave on the counter for 12 hours, or in the fridge for 24 hours for a perfectly low-acid brew.

3. Premium Filtration: Stainless Steel Mesh Filter Immersion Brewer

Pin this sleek brewer for a silt-free iced coffee experience!
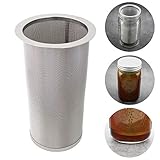
A dedicated immersion brewer featuring a stainless steel mesh filter and a borosilicate glass body is the gold standard for achieving exceptionally clear, sludge-free coffee. The magic lies within the fine mesh core. When a micron-level mesh filter is utilized, it efficiently traps fine coffee dust that would otherwise escape into the liquid.
Expert Insight: Even with a high-quality dual-layer metal micro-mesh filter, utilizing a burr grinder rather than a blade grinder is an absolute necessity. Blade grinders create unpredictable fines (microscopic coffee dust) that will inevitably slip through almost any metal mesh, creating unwanted sediment and bitterness.
Borosilicate glass is highly thermal-shock resistant and pairs perfectly with precision-cut metal filters, offering superior clarification compared to cheaper nylon mesh alternatives.
What You Need
- Borosilicate glass carafe brewer
- Dual-layer stainless steel micro-mesh filter
- Kitchen scale (for precise coffee-to-water ratio)
- 100 grams of coarsely ground specialty coffee
- 800 ml of filtered water
Brewing Steps
- Place the carafe on your kitchen scale and insert the micro-mesh filter.
- Weigh out exactly 100g of coffee directly into the filter basket.
- Tare the scale and slowly pour 800ml of water over the grounds, pausing halfway to let the coffee “bloom.”
- Cap the brewer and place it in the refrigerator.
- After 16 hours, slowly pull the filter straight up; the micro-mesh will hold back all the silt, leaving a remarkably clean and clear concentrate.
4. Dual-Purpose Design: Compact French Press Style Cold Brewer

Pin this clever dual-purpose brewing hack!
Repurposing a french press cold brew setup is a genius approach for minimalists seeking versatile coffee equipment with a remarkably small footprint. The classic plunger mechanism provides effective mechanical filtration, allowing for true dual hot/cold functionality without cluttering your kitchen with single-use gadgets.
An often-overlooked strategy: Because the coffee grounds float freely in the water rather than being confined to a narrow mesh cylinder, a French press allows for maximum full-immersion extraction. This uninhibited interaction between water and coffee often yields the boldest, most robust, and heavy-bodied flavor profile of all home methods.
This dual-purpose design is exceptionally straightforward to use and clean, making it a highly practical choice for everyday brewing.
What You Need
- 34 oz French Press with a dual-screen plunger
- Long wooden or silicone stirring spoon (never metal, to protect the glass)
- 1 cup coarsely ground coffee
- 4 cups room temperature water
Brewing Steps
- Remove the plunger lid and add the coarse grounds directly into the bottom of the glass carafe.
- Pour the water in, ensuring all grounds are saturated.
- Take your wooden spoon and give the mixture a gentle, thorough stir.
- Place the lid on top, but do not press the plunger down yet. Place in the fridge for 14-16 hours.
- When ready, slowly and steadily press the plunger down to the bottom, trapping the grounds, and pour your rich cold brew over ice.


5. The Professional Touch: Large Batch Nitro-Ready Cold Brew System

Save this pro-level setup for cafe-quality nitro at home!
For the serious enthusiast craving cafe-level decadence, a nitro cold brew maker elevates the at-home experience by infusing nitrogen gas directly into the beverage. This large batch commercial style system features a heavy-duty stout faucet tap that creates a cascading, creamy micro-foam.
As the nitrogen gas cartridges infuse into the cold brew, it radically transforms the texture, delivering a velvety, sweet mouthfeel without the need for added dairy or sugar.
Expert Insight: Understanding your gas options is critical. Pure Nitrogen (N2) provides that classic, cascading Guinness-like micro-foam without altering the flavor profile. Conversely, Nitrous Oxide (N2O) cartridges are easier to source but impart a very subtle sweetness. Always triple-filter your coffee before filling the keg to prevent frustrating tap clogs!
Investing in a nitrogen-infused keg system is the ultimate luxury for hosting events or sustaining heavy daily consumption.
What You Need
- 64 oz Stainless Steel Mini-Keg with a stout faucet
- 2-3 cups of pre-made, filtered cold brew concentrate
- Filtered water (to dilute concentrate)
- 2g N2 (Pure Nitrogen) or 8g N2O (Nitrous Oxide) unscented cartridge
Brewing Steps
- Fill the stainless keg up to the maximum fill line with a 1:1 ratio of your pre-made cold brew concentrate and filtered water. (Leave headspace for the gas!).
- Screw on the spear (the tap mechanism) tightly to ensure a seal.
- Insert the gas cartridge into the charger jacket and screw it in quickly until you hear the gas release into the keg.
- Shake the keg vigorously for 30 seconds to infuse the gas directly into the liquid.
- Place in the fridge for 1 hour to chill, then pull the stout tap handle forward to pour a beautifully cascading, creamy nitro cold brew.

6. Speed and Convenience: Rapid Extraction Cold Brew Machine
Pin this incredible 15-minute cold brew machine!
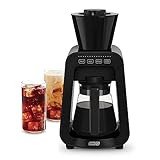
An electric cold brew maker utilizing rapid extraction technology is nothing short of revolutionary for those who frequently forget to prep their coffee the night before. By applying vacuum technology or centrifugal force, this automated brewing system aggressively agitates the coffee grounds, successfully bypassing the traditional 12-24 hour steeping time problem entirely.
What most guides miss: Because electric brewers rely on aggressive physical agitation rather than prolonged static contact, a slightly finer grind—specifically medium-coarse rather than extra-coarse—allows the rapid water flow to extract lipids and flavor compounds much more efficiently during that brief 15-minute window.
This 15-minute cold brew solution delivers remarkable speed without sacrificing the smooth, low-acid characteristics you expect from traditional slow steeping.
What You Need
- Electric Rapid Cold Brew Machine
- Medium-coarse ground coffee (slightly finer than traditional cold brew)
- Ice-cold filtered water
- Standard power outlet
Brewing Steps
- Fill the machine’s carafe with cold, filtered water up to the designated fill line.
- Load the filter basket with your medium-coarse coffee grounds and attach it to the machine lid.
- Secure the lid onto the carafe and place it on the electric base.
- Select your desired brew strength (Light, Medium, or Bold) on the digital interface.
- Press start. The machine will use vacuum/spin technology to aggressively agitate the water through the grounds, delivering a fully extracted batch in just 15 to 25 minutes!
7. On-The-Go Energy: Travel-Friendly Portable Cold Brew Bottle
Save this genius portable brewer for your morning commute!
A portable cold brew bottle offers unparalleled convenience for the busy commuter, blending a single serve cold brew maker with an insulated travel vessel. Featuring robust double-walled insulation and a highly secure spill-proof lid, this travel coffee maker ensures your beverage stays icy cold during long commutes or outdoor travel.
Expert Insight: To maintain temperature stability and ensure long-term durability, seek out bottles constructed from double-walled borosilicate glass or high-grade Tritan plastic. If you prefer models where the grounds remain inside the bottle while drinking, you must use an extra-coarse grind to prevent the coffee from becoming overly bitter and over-extracted by mid-afternoon.
The brilliant minimalist design dramatically reduces cleanup time and is perfect for single-person households or college students always on the move.
What You Need
- 20 oz insulated travel cold brew bottle with internal filter
- 3-4 tablespoons of coarse coffee grounds
- Cold water
- Ice cubes
Brewing Steps
- Unscrew the bottom or top filter basket (depending on bottle design) and add 3-4 tablespoons of coarse grounds.
- Secure the filter tightly and fill the bottle with cold water.
- Place the sealed bottle in your refrigerator before you go to bed.
- In the morning, grab the bottle. You can either remove the filter core and toss the grounds, or leave it in for an increasingly bold flavor throughout the day.
- Add a few ice cubes, secure the spill-proof lid, and head out the door!

Key Takeaways: Your Quick Guide to Cold Brew Coffee Makers
Mastering your cold brew equipment involves understanding a few crucial variables that dictate flavor and clarity. To achieve that signature smooth flavor and perfect barista-quality extraction at home, you must respect the science of steeping time and material interactions. Below is a highly scannable summary of the most critical purchasing criteria and brewing best practices to ensure your home brewing journey is an absolute success.
Key Takeaways:
- Grind Size is Non-Negotiable: Always use a coarse grind in your cold brew coffee maker; fine grounds will slip through the mesh, creating a muddy, bitter cup and clogging the filter.
- Patience Equals Smoothness: The standard steeping time is 12-24 hours; rushing the process results in weak, under-extracted coffee, while exceeding 24 hours draws out bitter tannins.
- Filter Quality Dictates Clarity: Look for laser-cut, dual-layer stainless steel mesh filters, which vastly outperform nylon nets in keeping your brew clear and silt-free.
- Glass Outperforms Plastic: Borosilicate glass carafes are highly recommended over plastic, as glass will never absorb coffee oils, rancid smells, or stain over time.
- Concentrate vs. Ready-to-Drink: Most home brewers make a heavy concentrate; remember to dilute your final product with water or milk (usually a 1:1 ratio) before drinking.
- Agitation Increases Extraction: If using a completely airtight model like a mason jar pitcher, giving it a gentle shake halfway through the brew time will yield a noticeably bolder flavor.
- Room Temp vs. Fridge: Steeping on the counter (room temperature) extracts flavor faster (12-14 hours), while steeping in the fridge takes longer (18-24 hours) but yields the absolute smoothest, most low-acid result.
FAQs About Cold Brew Coffee Makers
When beginning your cold brew journey, questions about optimal ratios, specific equipment, and exact steeping time rules are incredibly common. Knowing exactly how to make cold brew correctly ensures you maximize the potential of your equipment. We have compiled expert answers to resolve the most frequent uncertainties and guarantee you achieve the perfect flavor every single time.
How much coffee do you put in a cold brew maker?
The golden standard ratio for a cold brew maker is 1:4 (one part coarse coffee to four parts water) by volume to create a concentrate.
If you are using a standard 32oz (4 cup) brewer, you should use roughly 1 cup of coarsely ground coffee to 4 cups of filtered water. This creates a strong concentrate that you will later dilute with ice, water, or milk. For a ready-to-drink brew that requires no dilution, use a 1:8 ratio.
Can you use regular ground coffee for cold brew?
While you can use regular pre-ground coffee, it is highly discouraged because standard drip grinds are too fine and will result in bitter, muddy cold brew.
Most cold brew filters are designed for coarse grounds (resembling raw sugar or sea salt). Pre-ground coffee will slip through the mesh filter, leaving sludge at the bottom of your carafe, and the increased surface area will over-extract, causing the very bitterness cold brewing is supposed to eliminate.
Do you leave cold brew on the counter or in the fridge?
You can steep your cold brew in either location, but the fridge yields a smoother, lower-acid profile, while the counter extracts faster.
If you steep on the counter at room temperature, the process will take about 12 to 14 hours and produce a bolder, slightly more acidic flavor. Steeping in the refrigerator slows the extraction down, requiring 18 to 24 hours, but results in the sweetest, smoothest, and least acidic cup possible.
How long should I steep cold brew?
The optimal steeping time is between 16 and 24 hours in the refrigerator, or 12 to 14 hours at room temperature.
Never exceed 24 hours of total water-to-coffee contact time. After 24 hours, the water begins to break down the bitter tannins and woody plant fibers in the coffee beans, resulting in a harsh, astringent taste that ruins the smooth profile you are trying to achieve.
Why is my cold brew bitter?
Your cold brew is likely bitter because the coffee was steeped for longer than 24 hours, or your coffee grounds were too fine.
Other culprits include using poor quality tap water, using dark roast beans that are naturally bitter (try a medium roast), or leaving the brewer in a hot environment. To fix this, ensure you remove the filter basket promptly at the 18-hour mark and switch to a strictly coarse grind.
How long does homemade cold brew last in the fridge?
Undiluted cold brew concentrate will stay fresh in an airtight container in the refrigerator for 7 to 14 days.
Once you dilute the concentrate with water, its shelf life drops to about 2 to 3 days. If you add milk or dairy alternatives directly to the carafe, it must be consumed within 24 hours. For maximum freshness, always store it in an airtight glass container.
Should I stir my cold brew while it steeps?
You only need to stir your cold brew gently at the very beginning to ensure all the dry grounds are fully saturated with water.
Once the grounds are wet, active stirring is not required. However, if you are using an airtight mason jar system, giving it one gentle shake halfway through the steeping process can help boost the extraction rate and ensure a more even flavor distribution.
Do you use hot water first for cold brew?
No, traditional cold brew should be made entirely with cold or room temperature filtered water from start to finish.
Using hot water first (known as the “hot bloom” method) does extract flavor quickly, but it also instantly releases the acidic compounds and bitter oils that the cold brewing process is specifically designed to leave behind. For a true low-acid stomach-friendly coffee, avoid heat entirely.
How do you clean a cold brew coffee maker filter?
Empty the wet grounds into the compost, rinse the mesh filter under warm running water, and scrub gently with a soft dish brush and mild soap.
Coffee oils can build up in stainless steel mesh over time, causing clogs and rancid flavors. Once a month, soak your metal filter in a solution of equal parts hot water and white vinegar for 30 minutes, then rinse thoroughly, to strip away stubborn oil buildup and keep the micro-mesh clear.
Can I run cold brew through a paper filter?
Yes, if your metal filter leaves behind a slight residue, pouring the finished cold brew through a paper pour-over filter will create a crystal-clear cup.
Paper filters catch the microscopic fines and absorb some of the heavier coffee oils. While this extends the prep time, it results in a tea-like clarity and a cleaner mouthfeel, which many coffee enthusiasts strongly prefer.
Final Thoughts
Investing in a dedicated cold brew coffee maker is one of the most impactful upgrades you can make to your daily morning routine. By moving away from makeshift bowls and messy straining methods, you guarantee a consistently smooth, low-acid cup of coffee that rivals your favorite local cafe—at a fraction of the cost.
Whether you choose the high-capacity convenience of a glass spigot dispenser, the rustic airtight seal of a mason jar, or the rapid convenience of an electric extractor, the key to success remains the same: use filtered water, source high-quality coarse grounds, and respect the steeping time. Once you experience the sweet, nuanced flavors that cold extraction unlocks from a coffee bean, you will likely never want to pour hot coffee over ice ever again.
Which cold brew system fits your lifestyle best? Are you a set-it-and-forget-it fridge dispenser fan, or are you ready to experiment with a professional nitro keg? Let us know in the comments below!
Last update on 2026-10-22 / Affiliate links / Images from Amazon Product Advertising API
